I’m going to assume you have your CB1 already setup and can access it with SSH. If not please follow the official documentation.
Remember to install klipper, moonraker, mainsail etc, i recommend using kiauh.
Prerequisites
Unless otherwise stated all commands are done whilst logged into the CB1.
Whenever the “bridge mcu” is reset, Linux will disable the corresponding can0 interface. To ensure proper handling of FIRMWARE_RESTART and RESTART commands, it is recommended to use allow-hotplug in the /etc/network/interfaces.d/can0 file. For example:
allow-hotplug can0
iface can0 can static
    bitrate 1000000
    up ip link set $IFACE txqueuelen 128
EBB36 Bootloader
We are going to use Katapult (formerly known as CanBoot) on our EBB36 to simplify future management.
git clone https://github.com/Arksine/katapult
cd katapult
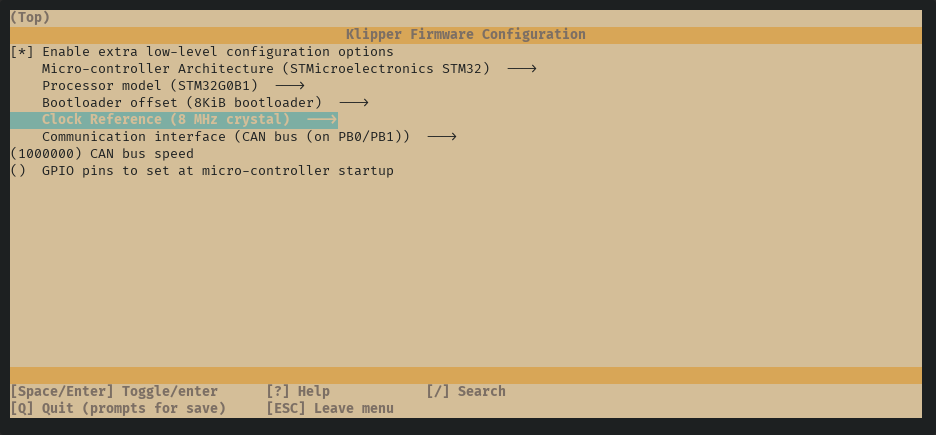
make menuconfig
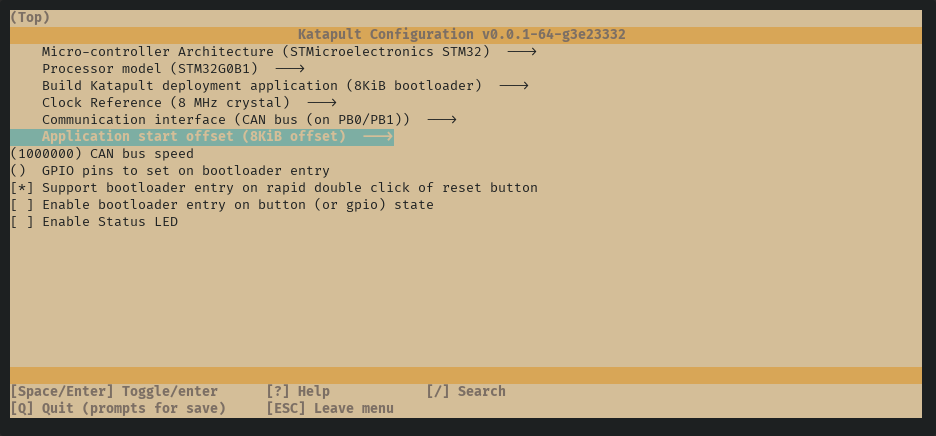
make clean
make
Now we will copy katapult.bin to our main pc to use with dfu-util.
Do the following commands for the rest of this section on your main pc.
# Replace with your CB1 private IP
scp biqu@192.168.20.15:/home/biqu/katapult/out/katapult.bin ~/
Install dfu-util with your preferred package manager, i will be using nix-shell as we only need the utility temporarily.
nix-shell -p dfu-util
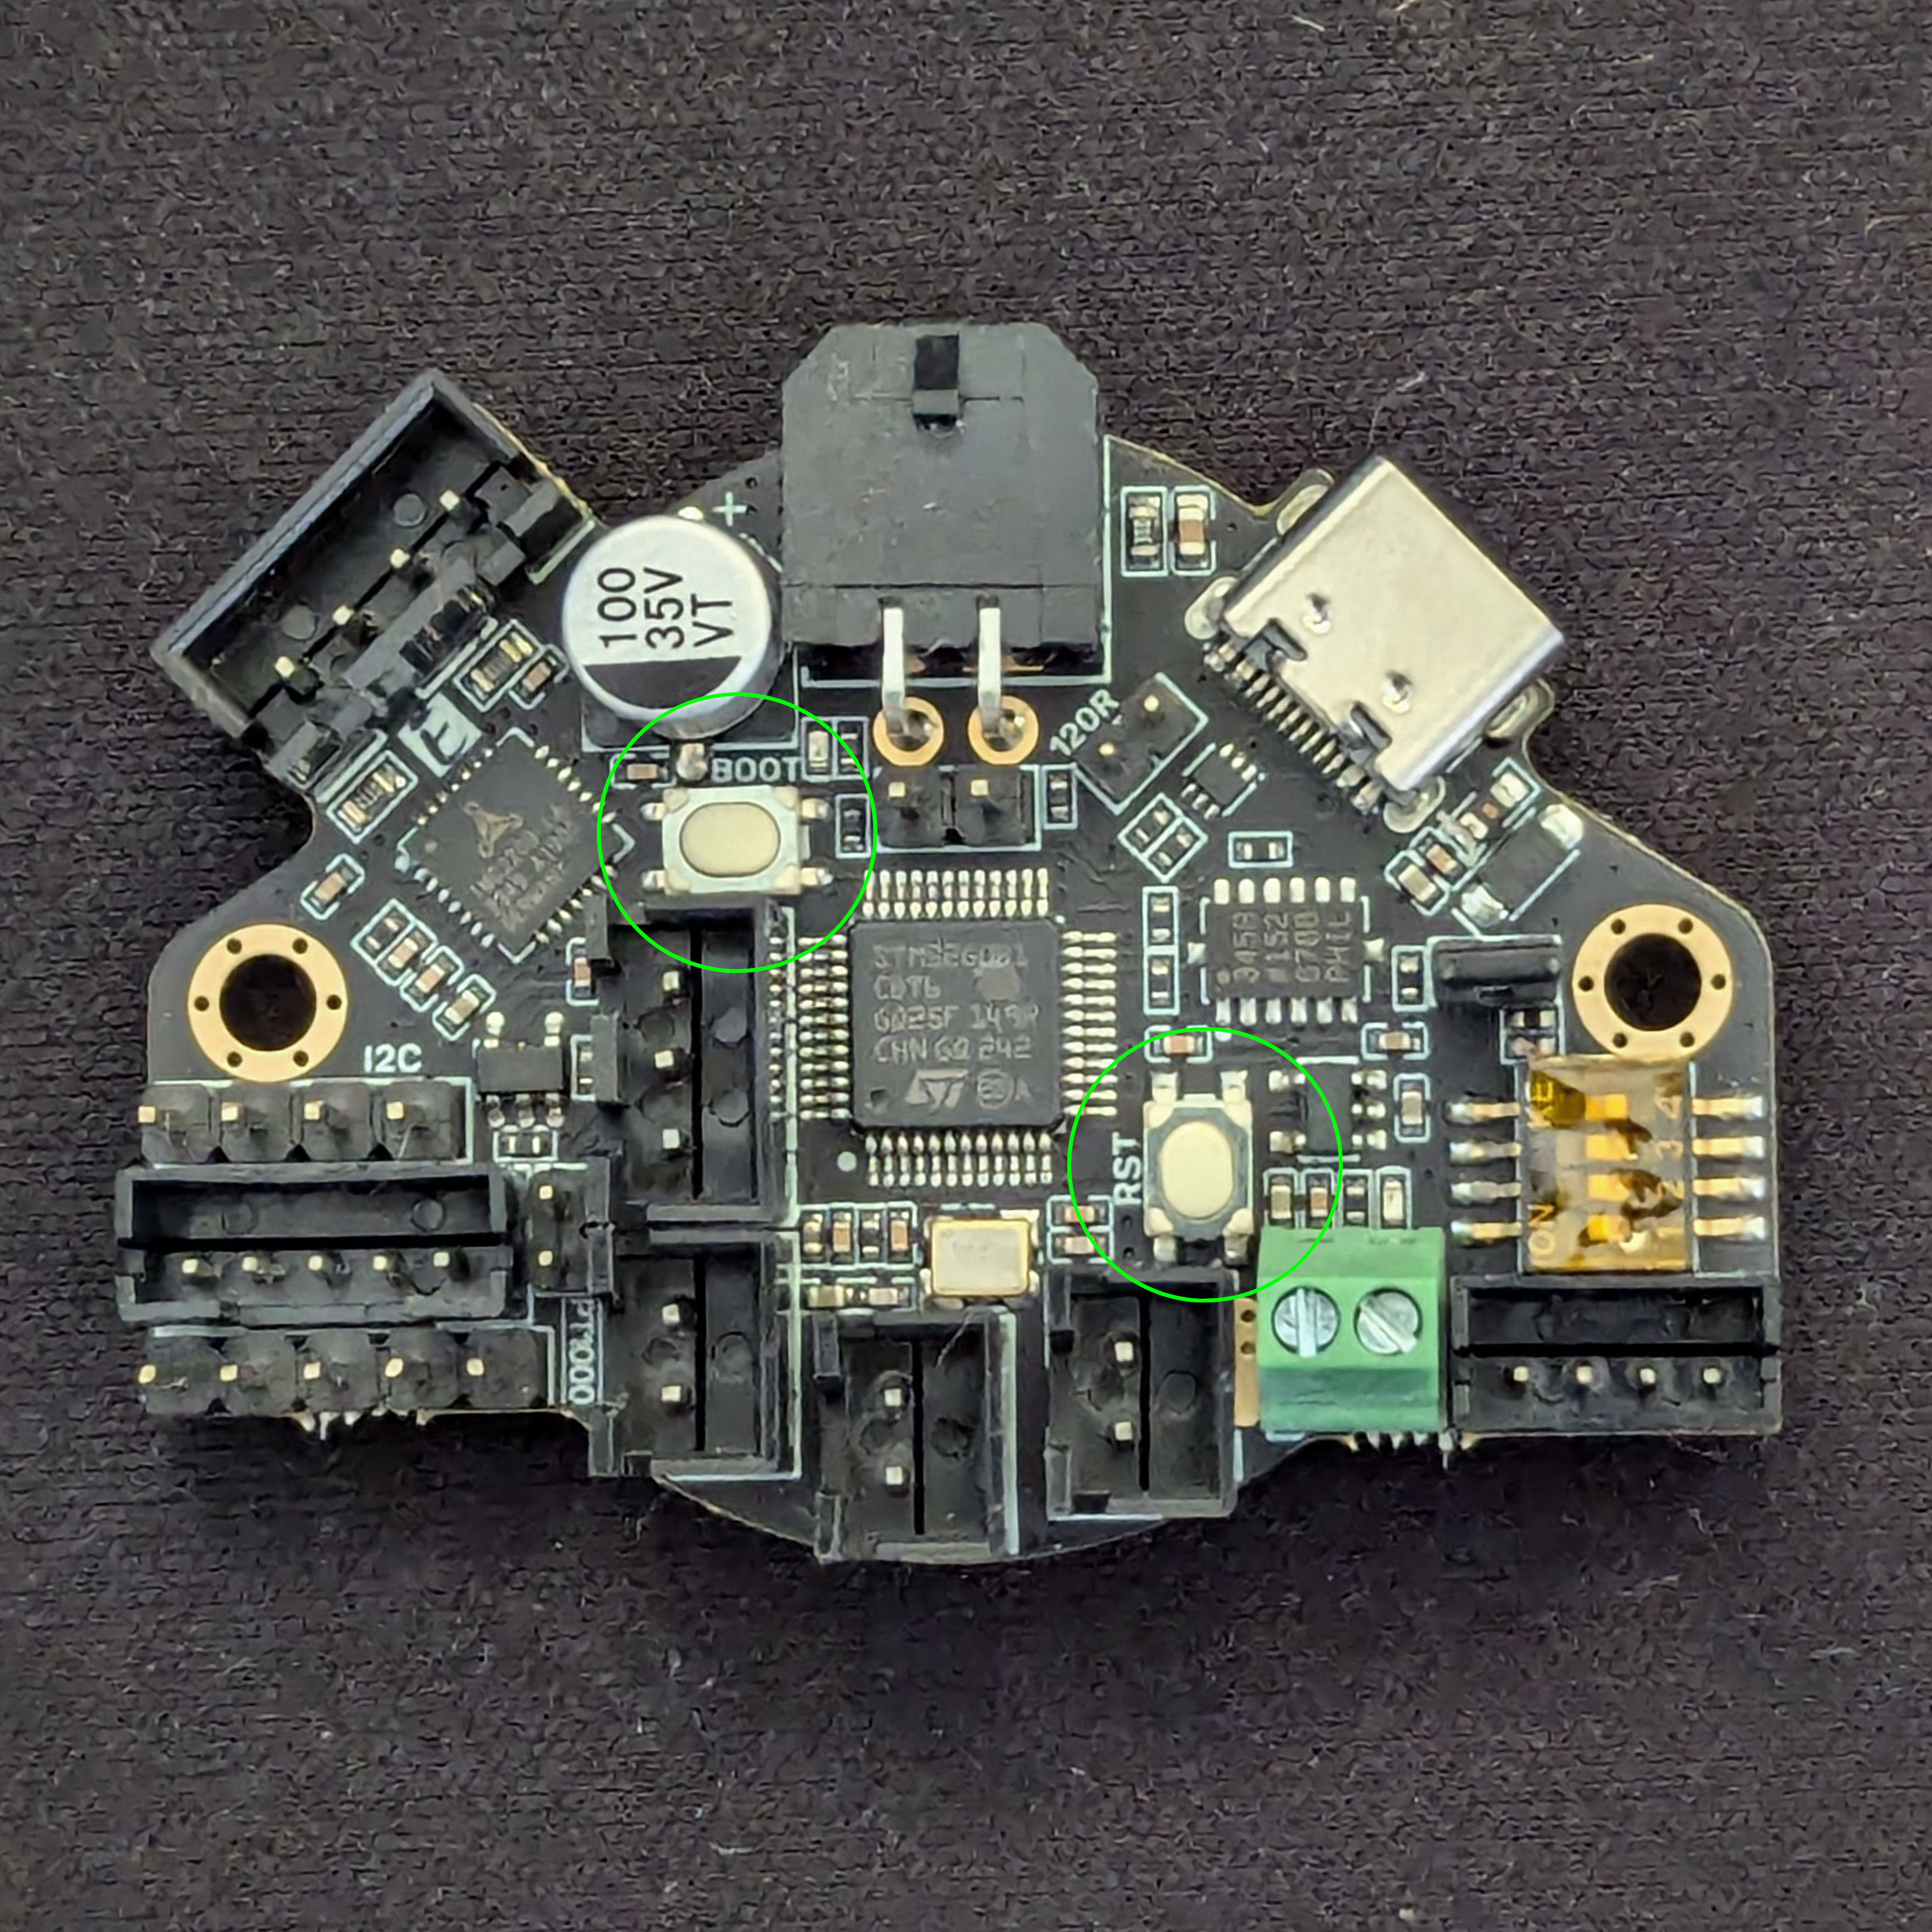
Now we must put our EBB36 into DFU mode todo this place a jumper cap on VUSB this allows the USB to supply power to the board.
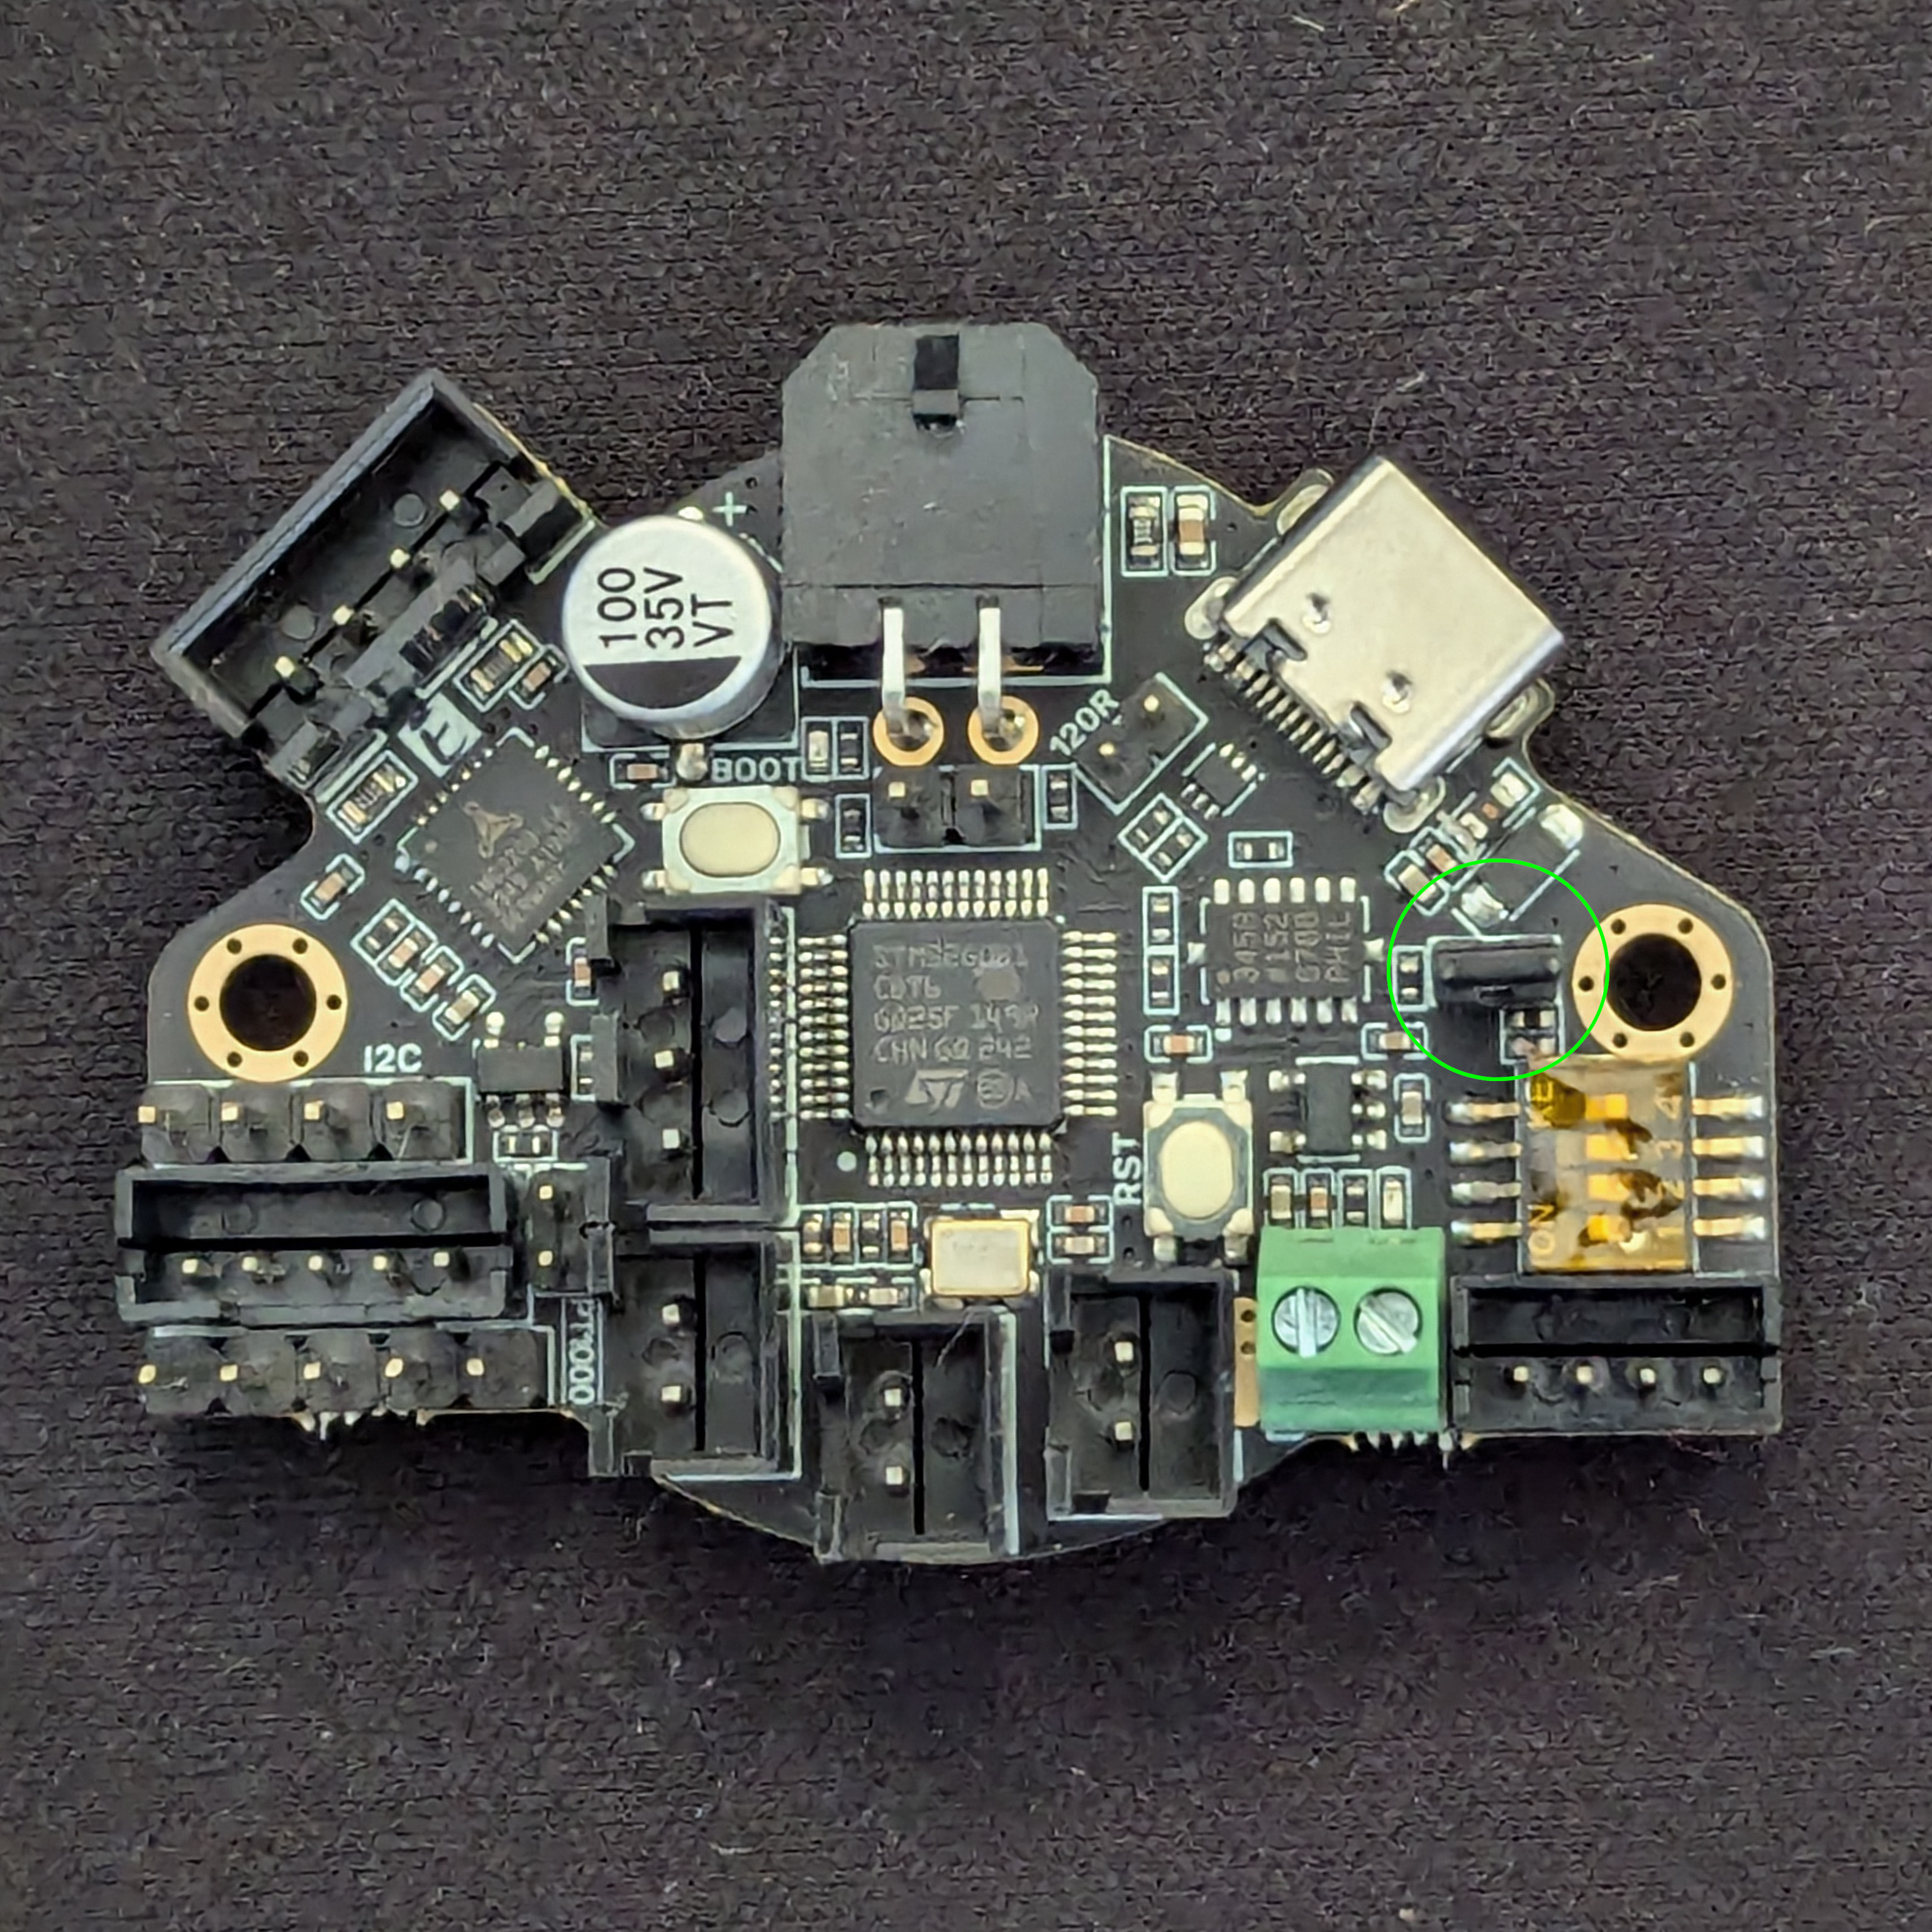
Plug a usb cable into the EBB36 and your pc, press and hold the Boot button, then click the RST button to enter DFU mode.
Now we can flash our bootloader to the EBB36. The following command also performs a full chip erase as recomended.
sudo dfu-util -a 0 -D katapult.bin --dfuse-address 0x08000000:force:mass-erase:leave -d 0483:df11
Ignore the following error: dfu-util: Error during download get_status
Disconnect the USB cable and remove the jumper cap as it is no longer needed, we can put the EBB36 on our toolhead now as future flashes will be done over the can network.
Manta E3EZ Firmware
We need to setup our E3EZ as a USB to CAN bus bridge todo this we will need to make a new firmware.
cd ~/klipper
make menuconfig
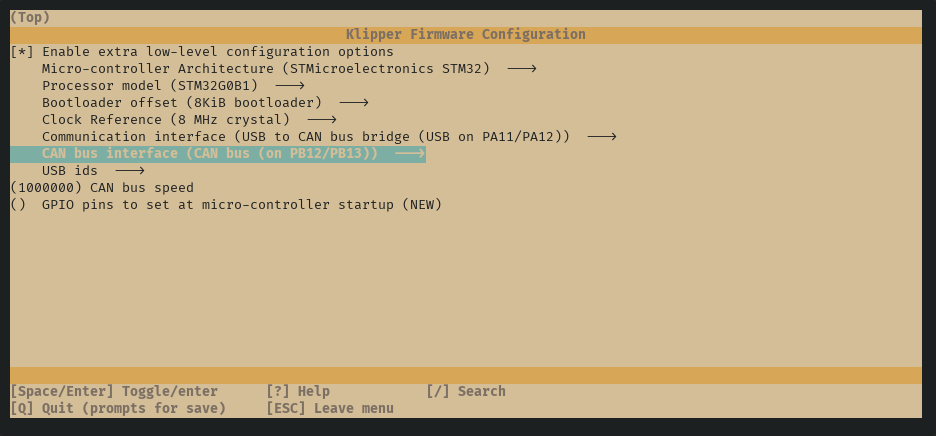
make clean
make
Now we are going to update via DFU
ls /dev/serial/by-id
# Copy the ID and replace xxx in the next command with it.
make flash FLASH_DEVICE=/dev/serial/by-id/xxx
After the writing is completed, there will be an error message: dfu-util: Error during download get_status, just ignore it.
Cleanup
As we are now using USB to CAN bridge our board will no longer be detected as a USB to serial device. Thus we must update printer.cfg to reflect the change.
# Find our canbus_uuid.
~/klippy-env/bin/python ~/klipper/scripts/canbus_query.py can0
# Update our printer.cfg
[mcu]
canbus_uuid: 11aa22bb33cc # Replace with the UUID we previously got.
EBB36 Firmware
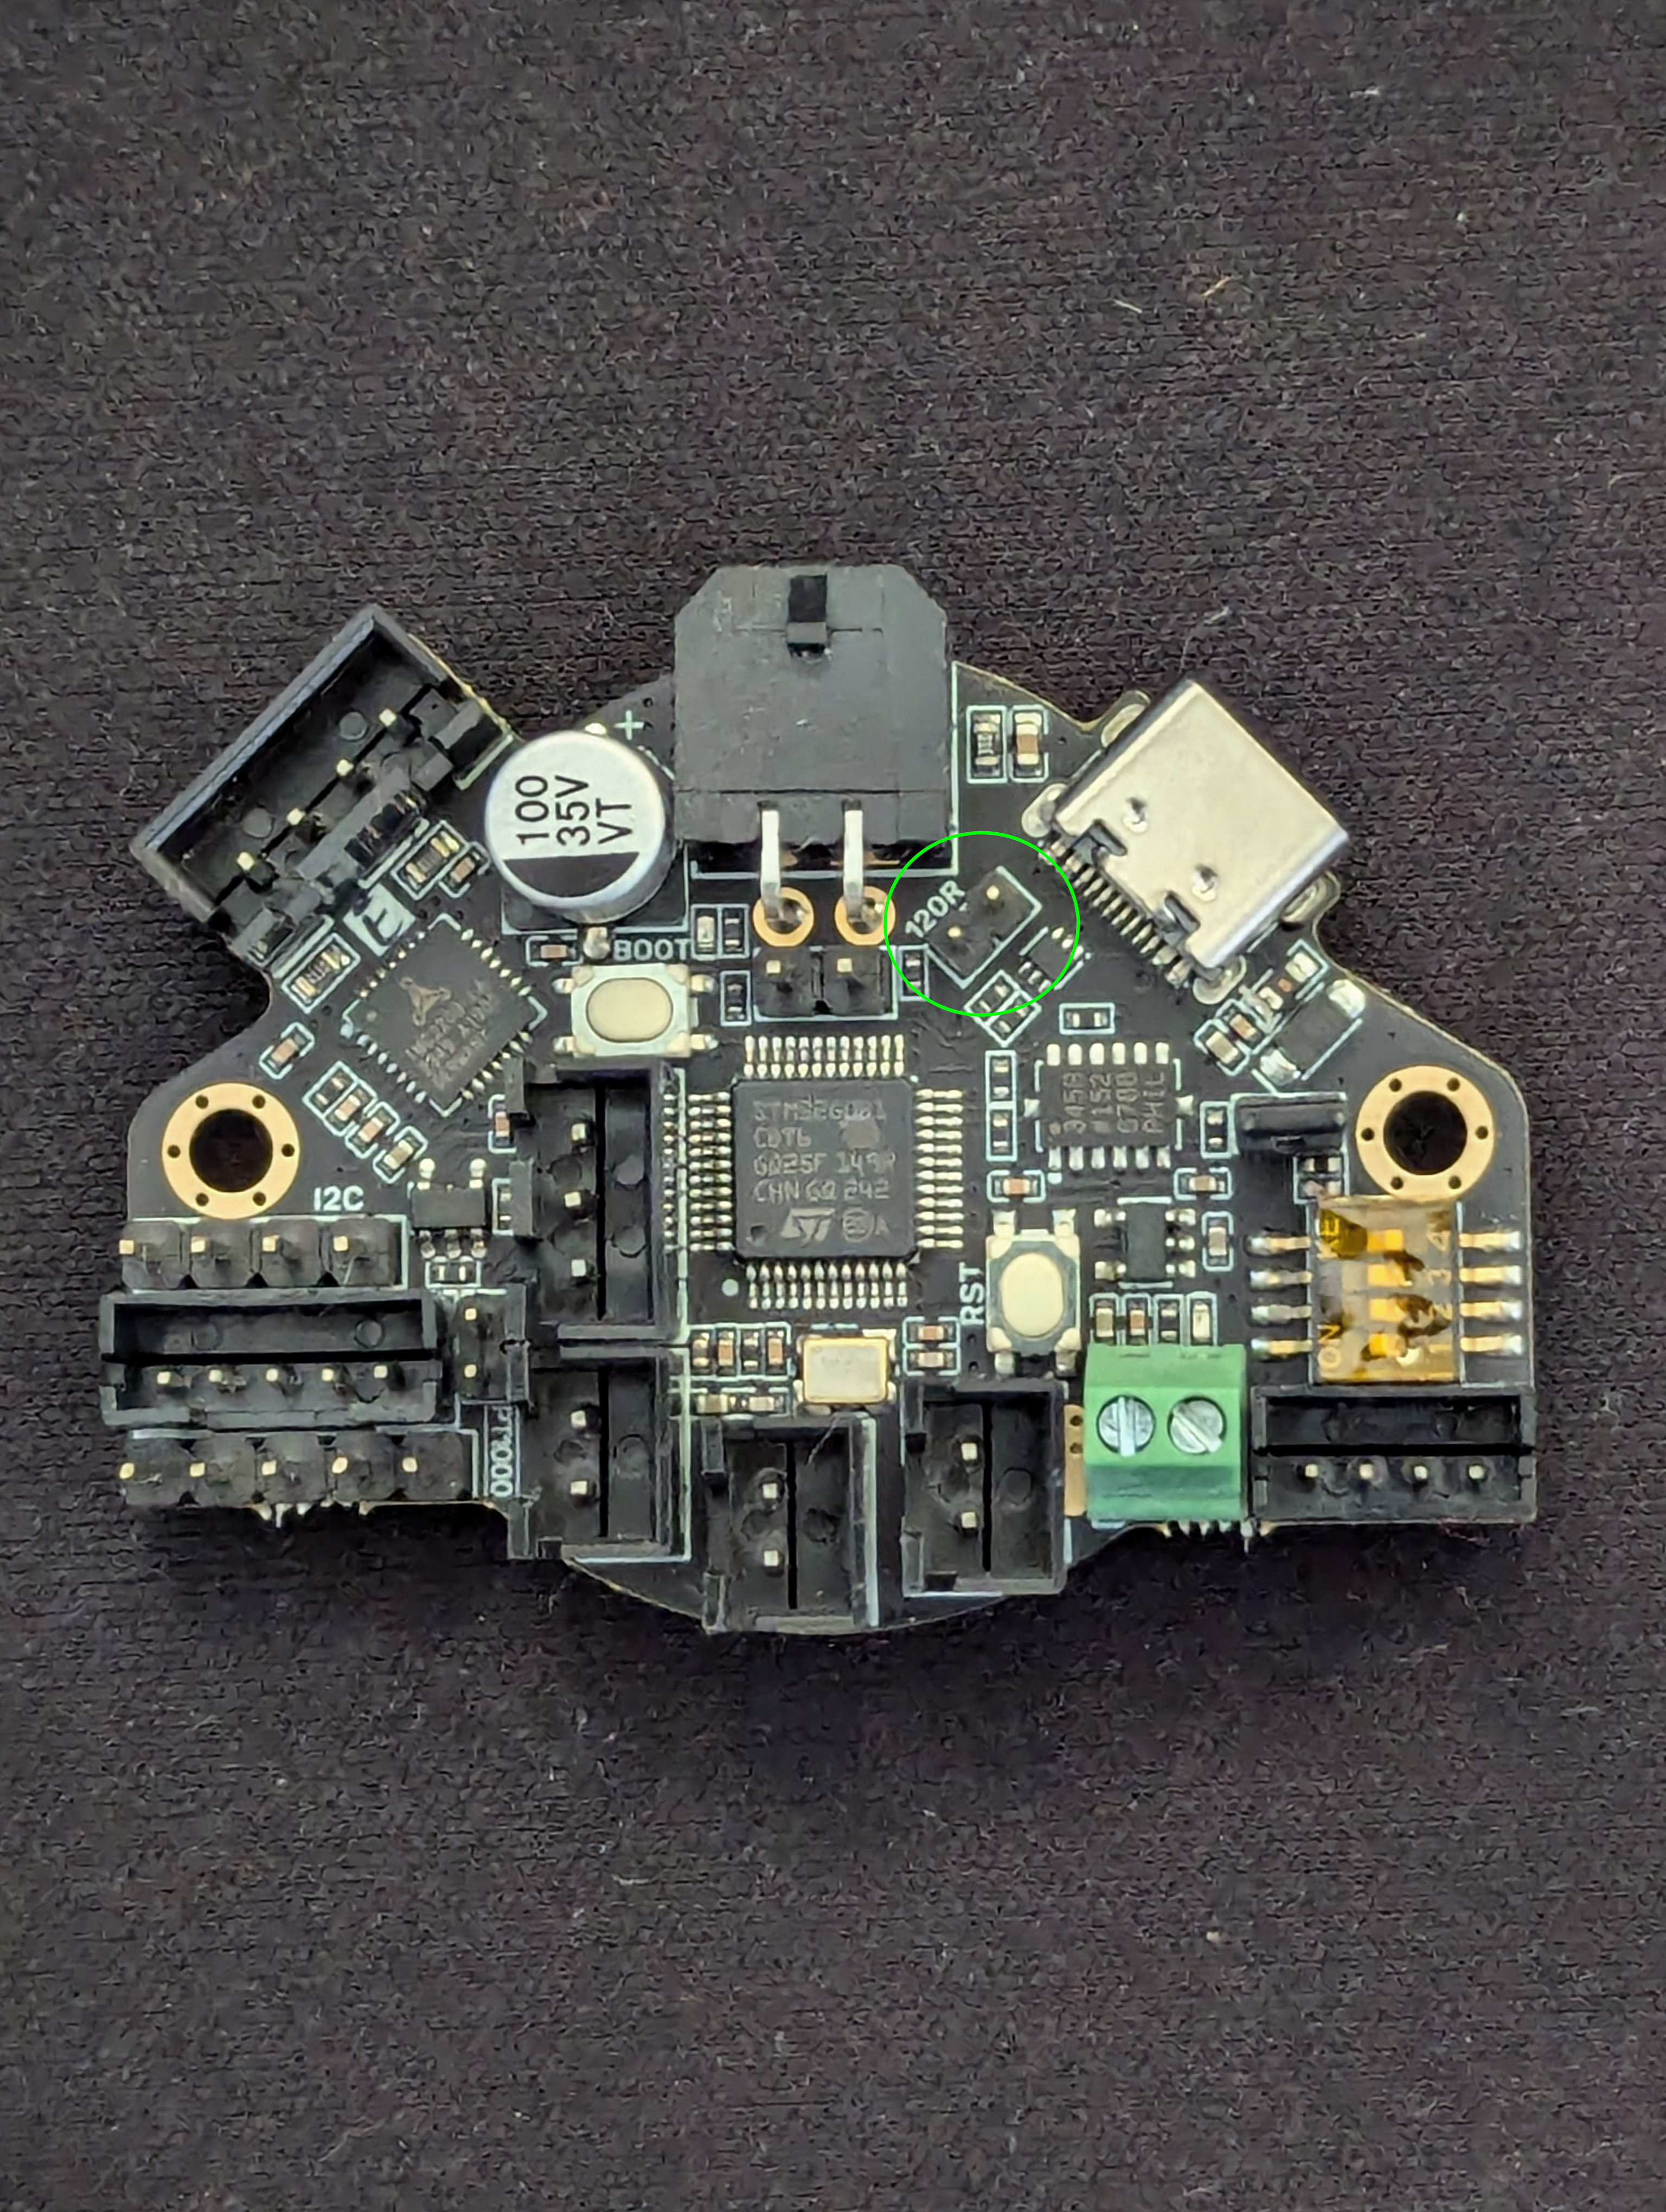
Ensure your EBB36 is connected to your E3EZ with your can cable, the following guide will show you how to make one if you haven’t got one already. Remember to put a jumper cap on the 120R resistor.
Lets check if we can detect the bootloader on our EBB36.
python3 ~/katapult/scripts/flash_can.py -i can0 -q
You should see a line with Detected UUID, and application Katapult. Save the UUID for later.
Now we need to build klipper firmware for our EBB36.
cd klipper
make menuconfig
make clean
make
Now to flash the firmware we just built.
# replace myUUID with the UUID from earlier
python3 ~/katapult/scripts/flash_can.py -i can0 -u myUUID -f ~/klipper/out/klipper.bin
You should see a line saying Flash Success.
Printer Configuration
Assuming you are upgrading an Ender 3 copy the following printer.cfg and ebb36.cfg. Otherwise a generic one is available in the repository. If you are using the generic ensure you change the applicable settings for your printer.
cd ~/printer_data/config
wget https://raw.githubusercontent.com/bigtreetech/Manta-E3EZ/master/Firmware/Klipper/printer-ender3.cfg
wget https://raw.githubusercontent.com/bigtreetech/EBB/master/EBB%20CAN%20V1.1%20and%20V1.2%20(STM32G0B1)/sample-bigtreetech-ebb-canbus-v1.2.cfg
mv sample-bigtreetech-ebb-canbus-v1.2.cfg ebb36.cfg
We must make some changes to the printer config to include the EBB36 configuration. If you don’t uncomment the relevant stepper section you’ll find yourself crashing into the gantry. Decide if you would like to use stealthchop or spreadcycle, if you choose stealthchop uncomment the stealthchop_threshold: line.
# printer.cfg
[include ebb36.cfg]

########################################
# TMC2209 configuration
########################################

[tmc2209 stepper_x]
uart_pin: PB8
#diag_pin: PC4
run_current: 0.580
#stealthchop_threshold: 999999

[tmc2209 stepper_y]
uart_pin: PC9
#diag_pin: PB0
run_current: 0.580
#stealthchop_threshold: 999999

[tmc2209 stepper_z]
uart_pin: PD0
#diag_pin: PC6
run_current: 0.580
#stealthchop_threshold: 999999
* Note the run_current has been changed this should prevent Ender 3 v2 motors from overheating (a few people have melted there y axis mount). If you use other motors ensure you set the correct run_current.
* Ensure you haven’t overwritten what we did here if so copy the [mcu] block over to our new printer.cfg
Go through and fix anything that may be unique to your printer, you can delete the extruder section and the fan section as we will be declaring these in the ebb36.cfg.
At a later point after the ebb36 is setup i recommend coming back and fixing your axis limits.
Configuration of ebb36.cfg will depend on your toolhead setup ensure your extruder (I assume you have upgraded to direct drive) is configured correctly, the following changes are for those using an orbiter v2.
# ebb36.cfg
[mcu EBBCan]
canbus_uuid: 0e0d81e4210c # Replace with the uuid from the #ebb36-firmware section.

[extruder]
dir_pin: EBBCan: PD1 # My extruder was running backwards *1
microsteps: 16
full_steps_per_rotation: 200
rotation_distance: 4.637
nozzle_diameter: x.xx               #define nozzle diameter
filament_diameter: 1.750
max_extrude_only_distance: 500
max_extrude_only_velocity: 120
pressure_advance: 0.025             #to be calibrated
pressure_advance_smooth_time: 0.03  #to be calibrated

[tmc2209 extruder]
run_current: 0.650 # Max 0.850 *2
driver_TBL: 0
driver_HEND: 6
driver_HSTRT: 7
driver_TOFF: 4
*1 you may need to remove ! to reverse the direction of the extruder.
*2 Ellis recomends to not exceed 50-60% of the rated current of your motor, they have a recomended run_current for the orbiter here.
Ensure you configure any other toolhead features you may have such as a bltouch or neopixel.
I recomend going through the klipper configuration checks to ensure everything is behaving as it should be.
Ellis’ Print Tuning Guide is an amazing resource for getting your printer running it’s best.